Showing posts with label Gum Paste. Show all posts

Saturday, May 28, 2011

Summertime Cupcakes!

♥ Beginner
We had a fantastic Enrichment Activity at church last night!  Of course I didn't get ANY pictures of the event, and all of the fun ladies that were there (I'm kicking myself now!) but we sure did have a blast, or at least I did. We talked about some simple appetizers ideas that were great for an easy quick get together, and I'm hoping that I can get the recipes for them so I can share them with all of you also.  


All of the cupcakes below were made of French Vanilla cupcakes, but if you're in a really creative mood, you could flavor them to the decorations.  I'll add my flavor suggestions along the way, and would love your feedback as well! 
~~~~~~~~~~~~~~~~~~~~~~~~~~~~~~~~~~~~~~~~~~~~~~

Butterfly Cupcakes! 
What you'll need: 
Pretzels
2 Colors of Frosting
M&M's 
Pull and peel Twizzlers


How it's done: 
Frost your cupcakes. Cut two small slits in cupcake on left and right of center. Put pretzels in the slits and cover with a skinny strip of different colored frosting down the middle.  Add an M&M and two small twizzlers for antennae. 
~~~~~~~~~~~~~~~~~~~~~~~~~~~~~~~~~~~~~~~~~~~~~~
Snow Cone Cupcakes! 
What you'll need: 
White Frosting
three colors of sprinkles (preferably bright colors!)
Styrofoam Cups
Straw and paddle (optional) 


How it's done: 
After baking your cupcakes, frost the tops and drop into the cups. If the cupcakes are smaller than the cupcakes, just cut down the cups until the cupcakes fit correctly.  Once the cupcakes are in the cups, 'get your sprinkle on'!  
~~~~~~~~~~~~~~~~~~~~~~~~~~~~~~~~~~~~~~~~~~~~~~
Beach Cupcakes! 
What you'll need: 
Blue Frosting
Crushed Graham Crackers
Small Round Peppermints
Drink Umbrellas


How it's done: 
Cover your cupcakes with the blue frosting.  Make waves! Dip your cupcake in the graham cracker crumbs, and top with a beach ball and umbrella.  I think these would be great with a strawberry cupcake! 
~~~~~~~~~~~~~~~~~~~~~~~~~~~~~~~~~~~~~~~~~~~~~~
Ice Cream Cone Cupcakes!
What you'll need: 
Cake Batter
Ice Cream Cones
Rice (optional) 
White Frosting
Sprinkles


How it's done: 
Fill your muffin pans 1/2 with rice.  Fill your ice cream cones 1/4th full with cake batter.  Put cones into the rice for stability, and bake for 20-25 minutes at 350*F. Once out and cooled, frost with an extra large tip to look like ice cream and top with sprinkles! 
~~~~~~~~~~~~~~~~~~~~~~~~~~~~~~~~~~~~~~~~~~~~~~ 
Corn-on-the-Cob Cupcakes!
What you'll need: 
3 Similarly sized Cupcakes
Yellow, White, and clear Jelly beans
Yellow Frosting
Black sprinkles
Yellow gum paste/Fondant (Optional) 
Cob Holders (optional) 


How it's done: 
These were my favorite because they were so cute.  Frost all of your cupcakes with the yellow frosting and apply rows of jelly beans to them, mixing up the colors.  Make sure all of you rows match from cupcake to cupcake.  Sprinkle a few black sprinkles for pepper, and stab each side with cob holders.  Make butter out of yellow gum paste (or a yellow starburst!).  Wahlah!! Corn on the cob for the sweet tooth.  
~~~~~~~~~~~~~~~~~~~~~~~~~~~~~~~~~~~~~~~~~~~~~~
Popcorn Cupcakes! 
What you'll need: 
Popcorn Bucket
Mini Marshmallows (White and yellow)
Knife
White frosting


How it's done: 
Frost your cupcakes with the white frosting.  Cut each marshmallow in half with your knife, and squish them back together.  Place on top of the frosting, and cover the cupcake! Place in the popcorn bucket, it's that easy! 
~~~~~~~~~~~~~~~~~~~~~~~~~~~~~~~~~~~~~~~~~~~~~~
Shark Cupcakes!
We didn't actually make these at our activity, but since we have the rest of them up here, and these are so easy, I figured I would add them.  They really are cute if you're making the beach themed ones as well! 


What you'll need: 
Blue candy disks 
Blue frosting 


How it's done: 
Melt your candy disks in the microwave (generally it's 30 seconds at a time), and pipe the candy onto wax paper in the shape of a shark fin.  Once cooled and hardened, place them on top of your already frosted cupcakes. (You could also just make the fins out of blue cardstock paper if you wanted to go an easier route!) 

Sunday, March 20, 2011

An Edible Paste... Finally!

♥♥♥ Advanced
I can promise you one thing, I NEVER tasted the paste in my kindergarten classroom.  My husband however, is a totally different story.  And he promises that it really did taste good.  In homage to my husband I've begun to play with Gum Paste - a paste that's acceptable to eat.  Finally.

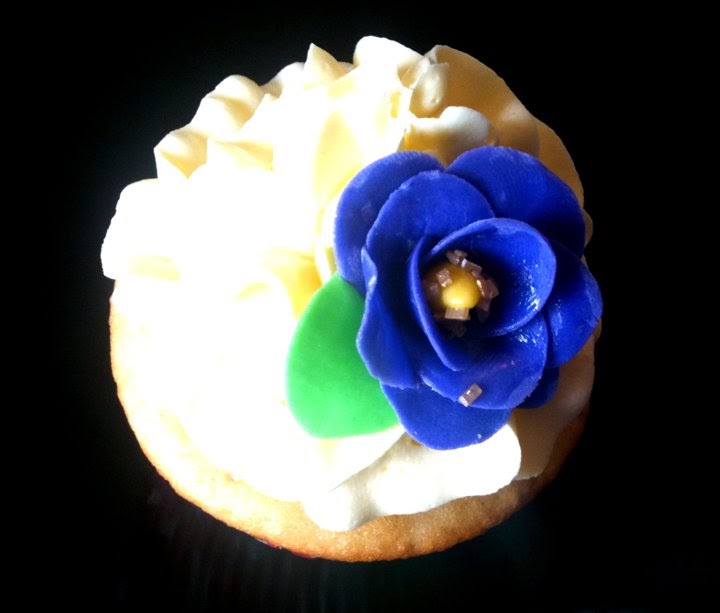
I made these gum paste flowers a few days ago, and added them to my cupcakes.  It brought a whole new level to my cupcakes and we're actually a lot of fun to make.  My daughter thought so too (I let her play with it too!),  and she definitely ate her fair share.

 I've had a few friends who have asked me how to make these little gems, so I figured it would be a good idea to put together a little tutorial (with what limited knowledge I have) on how they are made.  This really was my first attempt at these, so I'm sure there are more professional and easier ways to do this if you have all of the right tools - I'm just not there yet.  So we'll make due with what we have.  Sound good? Let's get started!

Here's what you'll need:
  • Food Coloring, or Icing Color, in the colors you prefer (Here's what I like)
  • A box of Tooth Picks (or dowel rods for larger flowers for cakes)
  • One Egg White (As an adhesive - although water can be used as a substitute, it generally doesn't hold as well.)
  • A paintbrush for applying the egg whites
  • If necessary, fondant cutters (shapes) or a knife.
  • If you want some texture in the centers of your flowers, you can use decorators sugar, etc.
  • Green Floral Foam (It makes it easier to stick your flowers in while they dry)
  • Rolling Pin
  • Wax Paper

To begin, mix up your Wilton's Gum Paste per the directions on the side of the can.  If you've purchased the pre-made gum paste you can skip this step.

Next, separate gum paste into several different pieces, depending on how many colors you plan to use.  I suggest about an 1/8 C. per color (So very little amounts if you're only making 10-12 flowers).  Generally, you'll be using more pink, blue, etc. than you will green or yellows for the leaves or stigmas. Add a little color to each section, and knead until they are the colors you like. (The amounts I'm showing are much less than 1/8 C, but I've been using them...)

Depending on the size flowers you will be making, the amounts may vary but for purposes of this tutorial, we'll be making 10-12 quarter size flowers (small enough to not be too heavy for the toothpicks). Once your gum paste is mixed, separated, and colored, we can begin making some flowers!

Lay out a sheet of wax paper, and dust it with a little powdered sugar so your gum paste doesn't stick.  Make sure that while you aren't using each color you keep them in airtight containers or Ziploc bags lined with shortening because the gum paste dries out VERY QUICKLY.

Take a *pinch* of yellow for the stigma, and gently roll it in between your two hands.  If your hands are too warm it will melt and stick to your palms.  You may need to dust your hands with powdered sugar, but remember that you need to work quickly because the paste hardens fast.

Once the stigmas are rolled to the shape you would like, stick the toothpick in the bottom end, and sit up in your foam to dry for 20-30 minutes.  I used a jar of rice because I didn't realize I was out of my floral foam, so anything will work as long as they can stand upright.  They don't need to be perfect, they can literally be any shape you would like!

Once the stigmas are dry, you can begin working on the petals.  This is when it gets to be a lot of fun.  You can make your flowers look any way that you would like! A one petal Calla Lily, punch outs from the fondant cutters, or even just a normal flower with hand shaped petals. Just roll out the paste color of your choice to the thickness you desire (I like 1/16 in), and start cutting!

*Preface: My gum paste has been colored for a few days, so it's a little more brittle than it would be if it were used the same day it were made.  My edges may be a little more rough than yours should be.

**Suggestion:  Make these the day before you serve the cupcakes, and leave them out over night. add them to your cupcakes just before serving.  If they are left covered or refrigerated they will wilt... go figure!

Calla Lily:
Roll out your colored Gum Paste to the thickness you desire.

Cut out desired shape.  Tear drop shape is best for Calla Lily's, but you can see here that I used a pointier shape. 

Pick up the petal and smooth and flatten the edges. Draw a line down the center lightly with your knife. This will allow the petal to bend easier in the middle.

Brush a small amount of egg white on the bottom half of your petal.  The egg white acts as an adhesive.

Be careful not to press too hard and pull the stigma off of the toothpick.  Between your warm hands and the moisture of the egg white, the stigma will become soft again. As you gently wrap the petal around the stigma gently smooth edges together.  You may have excess petal at the bottom of the flower but that's okay, just gently pinch off the excess and pull toward the bottom of the toothpick to remove it.
 
This should be what your Lily looks like after you've smoothed the petal around the stigma.

I like to lay the Lily's down on a plate to dry, in order to keep the petal upward. Once the flower is dry again (10-20 minutes) you can add a leaf if desired. (Leaf instructions below)
You can either leave the tooth picks in the flowers and use them as a support in the cupcake (I would suggest it), as well as making it easier to remove them from to cupcakes.  They are edible, but I would not suggest it since you use raw egg white as an adhesive. 

Six-Petal Flower

Again, you can remove the toothpick after it hardens, or leave it in, but my suggestion would be that you leave them in to add support while they rest in the frosting.
Roll out six pinches of gum paste, some larger and some smaller, into balls. 
Flatten each ball.
After smoothing and flattening each edge of each circle, wipe the bottom half of each in egg white.

Wrap one petal around the stigma, and flatten at the bottom.
Add another petal, overlapping the previous petal until three completely cover the stigma.
Add the final three petals at the intersecting points, and smooth the bottoms of each.
Wipe completely with egg white and allow to harden (10-20 minutes).

Let dry in upward position to keep the petals from flattening against any other surfaces.

Last, but certainly not least...
Leaves:
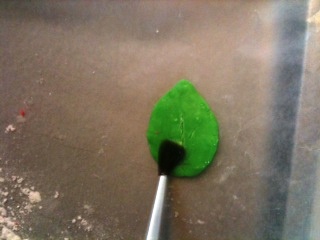
Just like the petals, begin with a ball, and flatten and form into a leaf.


Add egg white to bottom half of leaf...
Smooth onto the base of the flower.  I like to use it in a place where I feel like the flower may be uneven.
 
Sorry this photo is the wrong direction, but you get the idea. 
Let stand to dry - I like the completed flower to be able to dry over night.
Once the flowers have dried over night they should be almost rock hard.  You still have to be fairly gentle with them, but it should be pretty easy to stick them into your frosting and cupcakes.

And here's your finished product!
If you wish to have colored sugar on the stigmas, then just before you go to put them on the cupcakes, wipe the stigma in egg white and dip in sugar.

So, it's a far cry from those days in kindergarten when my husband would taste the paste, but I'm willing to bet he would prefer these anyway.  I hope you have as good of an experience as I have had making these beautiful little gems.  Please leave your comments below and let me know what you think or if you have any questions.

Good luck!