Showing posts with label Stuffed Cupcakes. Show all posts

Wednesday, January 25, 2012

S'mores Cupcakes

♥♥ Intermediate

I know that S'mores are typically a summer treat, but we seemed to be having them a lot around the new year (didn't I hear some where that they will bring luck to you throughout the year?) so I thought that it might be a good time to capitalize on a potential S'mores Cupcake.


If you like S'mores, you'll love these. If you're diabetic however, stay far away! These have double the sugar that most cupcakes do, and they're likely to put you in a sugar coma. These have by far been some of my favorite cupcakes yet.

What you'll need:

  • 1 Box Dark Chocolate Fudge (Duncan Hines) Cake Mix (You can use any chocolate mix, but this is the best) 
  • 1 1/3 Cup Water
  • 1/2 Cup Vegetable Oil
  • 3 Eggs
  • 1 Cup Graham Cracker Crumbs
  • 4 oz. Cream Cheese
  • 1/2 Cup Marshmallow Cream 
  • 2 Cups Powdered Sugar
  • Cream Cheese Frosting
  • Mini-Marshmallows
  • Chocolate (for decoration. I like Milk Chocolate Candiquik

How it's done: 

1. Preheat the oven to 350*F, and line muffin tins with paper cups. Spoon 1 Teaspoon graham cracker crumbs into the bottom of each liner.

2. Combine cake mix, water, oil, and eggs until thoroughly combined. Fill liners 3/4 full of cake mix, and bake for 19-22 minutes. Baking times will vary.

3. While cupcakes are baking, in a small bowl combine cream cheese, marshmallow cream, and powdered sugar until combined.

4. Once cupcakes have baked and cooled, make a small hole in the top of the cupcake and pull out a small amount of filling. (I like to use my hand-held apple corer for this job!)

5. Pipe cream cheese/marshmallow cream mixture into cupcakes. (Fill as much as you would like, but stop when cream reaches the top of the cupcake.

6. Pipe cream cheese frosting on top of cupcakes, and sprinkle with graham cracker crumbs. Drop a few marshmallows on top, and drizzle with chocolate. (If you use the Candiquik, the chocolate will harden quickly.

ENJOY!

Carrot & Cream Cheese "MuffCakes"


♥ Beginner

Originally, these were called inside-out cupcakes because the frosting is on the inside... however, these are more like muffins (because they are great for breakfast!) with a cream cheese filling. Now we call them "MuffCakes".

These were a great hit at the ward linger-longer, and although I anticipated bringing some home because they aren't very pretty, they were all gone before we snuck out. If you're a carrott cake lover, or cream cheese lover (like myself) then you'll love these sweet little muffcakes as much as we do.

I originally made these from scratch, making my own carrot cake, and they turned out pretty good. But the next time, I made them from a Duncan Hines Decadent box mix and not only were they easier, but they were much more flavorful. At roughly $3.00 a box, it was worth it for the ease. If you want the recipe from scratch, let me know and I'll post it. Otherwise, here's my recipe using the box mix (because let's be honest, you're going to take the easy route too.)

*Btw, I stole these from King Arthur Flour (but mine are better, cough) 


What you'll need: 

  • 1 Box Duncan Hines Decadent Carrot Cake Mix (New!
  • 3 Eggs
  • 1/4 Cup Vegetable Oil
  • 8 oz. Package of Cream Cheese (or Neufchatel Cheese)
  • 1/4 Cup Sugar
  • 1/2 Teaspoon Vanilla
  • 1/4 Teaspoon Lemon Juice

How it's done: 


1. Preheat your oven to 400*F, and grease or paper your muffin tins. (If you grease, your muffins will rise more and be fuller looking.)

2. Mix up your cake mix with the eggs and oil. Set aside.

3. Combine softened cream cheese, sugar, vanilla, and lemon juice until well blended. 


4. Pour 2 Tablespoons of carrot cake batter into muffin tins. Top with heaping tablespoon of the cream cheese mixture, and then cover with remaining batter. (You want the muffin tins 3/4 of the way full - or more if you're like me.)

5. Tap your muffin tin lightly on the counter to release any air bubbles.


6. Sprinkle the top with course white sparkling sugar, because who doesn't love a little extra sugar??

7. Bake for 20-25 minutes. Baking times will vary. Once baked, let them rest in the muffin tin for 5 more minutes before moving them to a cooling rack. Enjoy!

These little gems are perfect when eaten still warm, although they are just as good when they've had some time to cool too! 

Friday, July 1, 2011

Cinnamon Roll Muffins

♥♥ Intermediate

It's been far to long since the last post... but weren't those enchiladas scrumptious? I'm still dreaming about them. In fact, I might make more today.

However, these are the perfect dessert to those enchiladas - or the perfect breakfast for a nice Sunday Morning! (But they really should be eaten as soon as they come out of the oven, because they are soooo good warm.) By the way, I totally stole this recipe from my friend Kate over at A Dash of Sass. She has two cinnamon roll muffin recipes, but this is the one I like so I adapted it to my tastes.  Thanks for your help Kate!

Mixing in Flour
What you'll need:

  • 1 Cup Buttermilk (or 1 Cup Milk with 1 Tablespoon Lemon Juice) 
  • 1/2 Cup Brown Sugar (I even added more, because I'm a sugar addict) 
  • 1 Teaspoon Baking Soda
  • 1/2 Teaspoon Salt
  • 1/2 Teaspoon Vanilla
  • 1 Egg
  • 3 Cups - 3 1/2 Cups Flour
  • Icing (I used a cream cheese frosting - yumm!!!) 
Filling- 
  • 4 Tablespoons Butter, room temperature
  • 1 Cup Brown Sugar 
  • Not exactly a rectangle... 
  • 1 Teaspoon Cinnamon

How it's done:

1. Combine the Milk, Brown Sugar, Baking Soda, Salt, Vanilla, and Egg in a mixing bowl.  Slowly add the Flour until combined.

2. Turn the dough out onto a lightly floured surface, and knead for a minute or two.

3. Roll the dough into a 12 x 24 Inch rectangle. Spread the butter on top, and sprinkle with the Brown Sugar and Cinnamon.

4. Roll the dough into a log, beginning on the long side. Stretch the log slightly after it is rolled. Cut the log into 2 Inch pieces and place them in the greased muffin pan (or pan with cupcake liners).

5. Bake at 375*F for 18-20 Minutes, or until golden brown. Allow them to cool for 5 minutes before removing them from the muffin pan.

6. Drizzle with icing, and ENJOY!

Friday, April 1, 2011

Strawberry Cheesecake Cupcakes!

♥ Beginner

Who doesn't love strawberry cheesecake? They're crazy... or allergic to strawberries... if they do.

It's one of my favorite desserts, and mostly because of the creamy texture and sweet taste of the cream cheese, but I couldn't help wondering if it would be as good in cupcake form.

IT IS!!!  You HAVE to try this recipe if you're a fan of strawberry cheesecake.

What you'll need:
For the cupcakes -
  • 1 White Cake Mix
  • 4 Eggs
  • 1/3 Cup Oil
  • 1 Container of strawberries (apx. 3 cups pureed)
  • 1 (3oz) Strawberry Jello-O packet
  • 2 Tablespoons Flour
My awesome friends from church raise
chickens, and they gave me these to try.
They are awesome!!
For the Cream Cheese center -
  • 2 (8oz) containers of Cream Cheese
  • 2 Eggs
  • 1 Cup of Sugar
  • 1 Teaspoon Vanilla
How it's done:

We'll take it easy - in two parts. First, preheat your oven to 350*.

1. Begin by cutting the ends off of the strawberries, and cut them each in half.  If you have a food processor, get it out and ready to puree the strawberries.

2. Mix all of the other ingredients of the cupcakes until well blended.  The batter should be thick, if it's not, you can add more flour. Only mix until blended, if you over blend the eggs your cakes won't rise.

3. Once the batter is mixed, put your strawberries through the food processor and puree. The strawberries should be smooth without any large chunks. (I may be obsessed with my food processor, it's my favorite kitchen tool.)

4. Now add the strawberry puree to your batter, and your batter should be red like the picture above. Set aside.

5. Next we have to make the cupcake filling. Mix all of the ingredients listed above for the Cream Cheese center. It's as easy as just blending!! I did this in my food processor as well. It was pretty simple.


6. Line your muffin pans, and fill 1/3 of the way with the strawberry batter. Top with 1/3 cream cheese mixture, and then top with more batter.

7. Bake for 20 minutes, or until toothpick comes out clean.

8. Top with your favorite frosting... I prefer the Cream Cheese Frosting - tinted with a little pink food coloring! You could even topped with a strawberry.
McKinley Approves!


Sunday, March 20, 2011

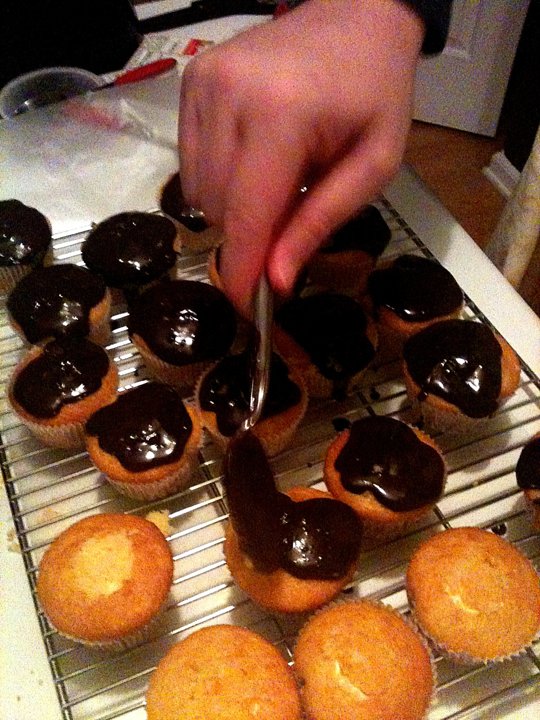
Not your Grandma's Chocolate Eclair Cupcakes

♥♥ Intermediate

 My grandma (we call her Bommie) is a great baker.  Even from the time I was little I can remember her making yummy pot roasts, divinity candy, and of course Eclairs. Her eclairs are things dreams are made of.  They don't always look super pretty, but it doesn't even matter because they taste so good. And really, it's all about the feeling we have when we can smell them baking in the kitchen. I'll never forget sitting around the Christmas tree with the entire family eating eclairs and laughing about the silliest things.  

So, in homage to my Bommie, I decided to create a Chocolate Eclair Cupcake.  I'll be honest with you, I like the concept and the taste (they taste exactly like an Eclair) but it's still not up to par with the actual Eclairs that Bommie makes.  Maybe it's just one of those things that no other baked good will even be able to live up to. However, in an attempt to make a quick eclair that tastes awesome, this is what I created. I hope you'll be able to share this with your family, and maybe even make it one of your favorite memories too.

For those of you who may not know what an Eclair even is (shame on you, but my husband didn't know either so you're in good company), it's traditionally a hollow choux pastry stuffed with a creamy ricotta or vanilla pastry cream topped with a chocolate glaze. Basically, it's a great treat that is easy to convert to a cupcake!

*I apologize in advance for my photos, I took them with my cell phone, even though I knew better. :)

**These cupcakes require refrigeration, will last up to 4 days refrigerated in an air tight container.

What you'll need:

Here's the deal, I'm a fan of using a box mix for my cupcakes IF they are the appropriate flavor.  I'm not running a business where I have to worry about excess overhead, and I don't see the need to reinvent the wheel either.  With that said, I'm a fan of using a traditional yellow cake for this recipe. (Duncan Hines has a fantastic yellow cake.) But if you're feeling adventurous, you can make your own cupcake batter too. This cupcake recipe is an all around "Cheat" to cupcakes - it's pretty much all a mix!
  • Yellow Cake Mix
  • French Vanilla Instant Pudding Mix
  • 2 C. Milk
  • 8 oz. Whipped Cream
  • 1/2 C. Heavy Cream
  • 4 oz. Semisweet Chocolate
How to do it:

1. Preheat oven to temperature set on cake mix, and mix cupcake batter. Bake. Let cool completely.

2. Mix Vanilla Pudding as directed on packaging, let set.  Once pudding is set, fold in whipped cream to make it light and fluffy.

3. After the cupcakes have cooled, take a sharp knife to the center of the cupcake in a circular motion cutting a nickle sized hole in the top of the cupcake and removing some of the insides. Take all of the removed portions and crumble them up and set them aside.

4. Using a piping bag with no tip, fill the cupcakes to as close to the top of the cupcake as possible (sometimes if you bang the cupcake on the counter after filling them, the filling will seep further down into the cupcake removing air and allowing you to fill them even more).

5. Cover the hole in your cupcake with the crumbled cupcakes filler that you set aside.

6. Heat cream until you see bubbles forming at the edge. Remove from heat.

7. Add chocolate and let sit for a minute, and then stir until smooth.

8. Drizzle on top of your cupcakes for the finished product!  (The chocolate is the BEST part!) They do not have to be perfect, half the fun is in how imperfect eclairs really are!

Italian Cannolli Cupcakes

♥♥ Intermediate
These cupcakes were a real treat around our house.  With my family being part Italian (my maiden name is Vivona, is there any question?) they were a real crowd pleaser.  The only tough thing with these is that you should only really make as many as you can eat in one sitting (or have fridge space for). But really, they make such a great dessert.  And they need to be eaten with a fork, so I can call it dessert!

Because they are filled with a riccotta cheese, they'll need to be refrigerated once they're made. 

What you'll need:

Vanilla Cupcakes: (Or you can use a Vanilla Cake Mix like this one)
Yields 24 Cupcakes
  • 2 1/2 cups flour
  • 1 teaspoon baking powder
  • 1/2 teaspoon baking soda
  • 1/2 teaspoon salt
  • 3 large eggs
  • 2 cups sugar
  • 1 cup oil
  • 2 teaspoons vanilla extract
  • 1 cup sour cream
Chocolate Chip Cannolli Cream Filling:
  • 16 ounces whole milk ricotta cheese
  • 3/4 cup confectioners' sugar
  • 1/2 teaspoon vanilla extract
  • 1/2 cup mini semisweet morsels
How it's done:

1. Preheat the oven to 350* and line the cupcake pans with liners.

2. Sift the flour, baking powder, baking soda, and salt in a bowl. Set aside.

3. In a mixing bowl fitted with a whisk attachment, beat the eggs and sugar until blended. Scrape down the sides of the bowl. Add the oil and vanilla. Mix until well blended. Add the sour cream. Mix until just mixed in, not too long.

4. Add the dry ingredients to the wet mixture, and mix until just blended.

5. Fill the cupcake liners three-quarters full with batter and bake until baked through and golden brown, about 18 to 22 minutes. Let them cool completely on a wire rack.

For the Cannolli Filling:


1. In a mixing bowl fitted with the whisk attachment, beat the ricotta, confectioners' sugar, and vanilla on medium speed for about 5 minutes. Stir in the mini morsels.

To Assemble:

Using a small knife, cut on an angle directly into top of the vanilla cupcake in a circular pattern, staying within the perimeter of the top, removing the inside of the cupcake in one piece. Take all of the removed pieces of cupcake and crumble all together into a small bowl.
 
Using a piping bag (without a tip), fill the inside of the cupcake with Chocolate Chip Cannoli Cream. 

Top the filled cupcake hole with the crumbled cupcake fillings, and frost with a Classic Buttercream Frosting. Top with mini chocolate chips if desired!

Stuffed Black Forrest Cupcakes!

♥♥ Intermediate

These are my #1 Favorite Cupcakes EVER!

What you'll need:

1 package chocolate cake mix (unless you're up for making your own batter) - This is what I would suggest if you're using a mix.
1 package (8oz) Philladelphia Cream Cheese
1 Egg
2 Tablespoons Sugar
1/2 Can Cherry Pie Filling
1 Jar of Marachino Cherries

How to do it:  
1. Preheat the oven to 350*, and mix the cake batter as directed on the package.

2. Mix cream cheese, egg, and sugar until well blended.  Don't over mix though, just until creamy.

3. Pour 1 1/2 Tablespoons cake batter into baking cups, cover with 1 Tablespoon of the cream cheese mixture. Top with 2-3 cherries of the pie filling, and cover with remaining batter.  (Once all is said and done, you shouldn't be able to see any cherries or cream cheese!)

4. Bake for 18-23 minutes, or until a toothpick comes out clean.  Let cool for 5 minutes in the pan, and then remove and let set on a wire rack.

5. Top with Butter Cream Frosting and a cherry!

These make a really great treat for gifts.  Everyone is always impressed when they take a bite of these special cupcakes, and discover that they're filled! 

Enjoy!