Sunday, March 27, 2011

Key Lime Cupcakes

♥ Beginner

I made these the same night that I made the Pina Colada Cupcakes, and to be perfectly honest, I'm going to sleep with numb taste buds.  I might have licked the spatula a few to many times...

I'm not sure how you feel about key lime pie, but it's one of my favorites, so these cupcakes are a real treat.  The batter didn't taste right to me, but once they were cooked and frosted they tasted perfect.  (So if you lick the spoon, just know the flavors emerge when baking!)

What you'll need:
  • 1 Box of White Cake Mix
  • 3 Eggs
  • 3/4 C. Buttermilk
  • 1/2 C. Water
  • 2 1/2 Tablespoons of Lime Juice
  • 1 Tablespoon of finely shredded Lime peel
  • 1/4 Teaspoon of neon green food coloring (I used a little more!)
  • 1 Container of Cream Cheese Frosting (I use the premade frosting instead of making my own, because it's easier than having to refrigerate my cupcakes - which I would have to do with homemade cream cheese frosting)
  • 1/2 Teaspoon vanilla extract
  • Lime Curls to top!
How it's done:

1. Preheat oven to desired temperature on box mix.  Mine was 350 degrees.  Line your cupcake pans with liners.

2. Combine cake mix, eggs, buttermilk, water, lime juice, lime peel, and food coloring. Mix on medium speed until combined (about 90 seconds). Don't over mix or your cakes wont rise!!!

3. Bake for time suggested on box mix. Mine were baked 15 minutes.  Let cool in pan for 10 minutes, and remove to wire rack.

4.  While cupcakes cool, mix frosting and vanilla extract together in medium size mixing bowl.  If piping onto cupcakes, add a little sifted powdered sugar to stiffen the frosting. 

5.  Assemble!  Pipe frosting onto cupcake, and top with a lime curl!

**Suggestion!!! Wait until the cupcakes are completely cooled before frosting!  I didn't, and in effect, my cupcakes ended up with landslides of frosting.... it was lame. I knew better.

These cupcakes really taste amazingly similar to key lime pie - I hope you enjoy them as much as I do!  I really like the idea of even topping the frosting with crushed Graham cracker too.  Get creative and let me know how yours turn out.  The greatest thing about these cupcakes is that the flavors are completely up to you, it's all about the extract you add!  Enjoy!

Pina Colada Cupcakes

♥ Beginner

Who's ready for summertime?  Me! Me! Me!


I had a friend send me a request for a Pina Colada or Key Lime Cupcake recipe, so I figured I would give them both a go.  But first, drum roll please... 

Pina Colada Cupcakes!!!!

Let me begin by saying that I don't drink alcohol - at all - so I don't come into a project like this one with a discerning pallet for what a pina colada actually tastes like.  However, I did go out and purchase a pina colada mix which I made in the blender with a handful of ice cubes... and it sure was yummy!  So, armed with the knowledge that I had, I began the process of making the perfect pina colada cupcake. 

*Just as a reminder - I'm trying to make "baker friendly" recipes that will be easy for even the most amateur baker.  If you would like to make your own cupcake batter and frosting without using the premade mixes, that's okay too!

What you'll need:
 
  • 1 Box Yellow Cake Mix 
  • 1/3 C. Vegetable Oil
  • 1/4 C. Water
  •  1 Teaspoon Rum Extract
  •  1 (8oz) Can of Crushed Pineapple (Leave it in the juice!)
  •  3 Eggs
  •  1 Teaspoon Coconut Extract
  •  1 Teaspoon Rum Extract (Second Teaspoon, one is for the cake the other for the frosting!)
  • 1 Container of Vanilla Frosting (I like Duncan Hines)
  • 2 C. Shredded Coconut
How it's done:

1.  Preheat your oven to the temperature stated on your box mix.  My Pillsbury Mix called for 350*.  Line your cupcake pan with liners.

2.  In a large mixing bowl, beat cake mix, oil, water, rum extract, pineapple, and eggs on medium speed about 2 minutes. I added a smidgen more pineapple and rum extract - I like the more powerful flavor.
3. Once batter is mixed, fill cupcake liners 2/3 of the way full. 
4. Bake for amount of time suggested on you cupcake mix box (mine was 16 minutes)

5. Remove from oven and cool for 10 minutes before removing from the cupcake pan. 

6. Toast the coconut - evenly spread the coconut on a cookie sheet and stick in the oven for 15 minutes, turning the coconut with a spatula every few minutes.  FYI, it burns REALLY QUICKLY! Once browned, remove from oven and let cool.

7.  Put vanilla frosting in a large mixing bowl and combine with rum and coconut extracts.  (I added a little more than I said on this recipe because I like the stronger flavors, but you don't need to.)

8.  If you plan to pipe the frosting onto the cupcakes then you'll need to add a sifted 1/2 C. of Powdered Sugar to your frosting to make it nice and stiff.  (This is when you'll need to add extra extract to your frosting.)

9.  It's time to assemble!  Pipe frosting onto cupcakes, and top with the browned coconut!

These cupcakes totally "take the cake" if you're looking for a really fun summertime treat.  Even if you're just dreaming of summer!

Wednesday, March 23, 2011

Packing up those treats...

If you're anything like me, you've probably reached that critical moment when you've made up a treat to take to a friend and stopped to think "Now, what will I take this to them in?" Tupperware often seems too cheap looking (and it's never the right shape or size, so the treats look junkie when they reach their destination) and a paper plate covered in seran wrap just isn't your style.

My mom always taught me that the first impression is the lasting impression, and the same goes for your treats too.  If the packaging looks nice, the impression is that the treat inside will be just as nice. 

So for those of you who have reached this critical impass in your baking, I'm helping make the decision a little bit easier!

Since I'm a cupcake maker, I'm often in the market for a good cupcake box.  Depending on the type of cupcake I'm making, or the holiday, usually dertermines the box I will use. Some of my favorite boxes (and the easiest to get my hands on) I get at Michaels Craft Supply or Hobby Lobby.  Let's kick this off with a couple of boxes to determine what sizes you'll need for your project... 

I'll add all the links at the bottom in case you want to order any of these.

There are Cupcake boxes that hold 1 Giant Cupcake
(Some with windows, some without) And you can get them in a ton of colors too.


This is what the standard insert looks like, these are great for holding your cupcakes in place.

They also make these type of boxes in 4,6,12, and 24 holders too!  You have more than enough choices.

There are also some more specialty boxes that you can use too! 

How cute are these???

The favorites that I've purchased so far only held 2 cupcakes, but they were perfect for Valentines Day...

And would you believe it, I bought these for $1/3 pack!  It's the best to shop the clearance section!

There are a ton of options when it comes to buying cupcake boxes and treat boxes.  And some can be a lot of fun.  My sugestion is always to try your local craft store before ordering bulk items online, but of course sometimes we get into a frenzy!  :) 

To look at purchasing cupcake or treat boxes in bulk, try:

Monday, March 21, 2011

Basic Vanilla Cupcakes

♥ Beginner
Sometimes you just need a really good Vanilla Cupcake.  Nothing fancy, nothing too flavorful, just a really nice base cake that will accentuate the exciting frosting and decorations that you'll put on them.  In this case, if you won't be using a mix, you'll need a recipe so here it is. 

This yields 24 Cupcakes...

What you'll need:
  • 2 1/2 cups flour
  • 1 teaspoon baking powder
  • 1/2 teaspoon baking soda
  • 1/2 teaspoon salt
  • 3 large eggs
  • 2 cups sugar
  • 1 cup oil
  • 2 teaspoons vanilla extract
  • 1 cup sour cream


How it's done:

1. Preheat the oven to 350* and line the cupcake pans with liners.

2. Sift the flour, baking powder, baking soda, and salt in a bowl. Set aside.

3. In a mixing bowl fitted with a whisk attachment, beat the eggs and sugar until blended. Scrape down the sides of the bowl. Add the oil and vanilla. Mix until well blended. Add the sour cream. Mix until just mixed in, not too long.

4. Add the dry ingredients to the wet mixture, and mix until just blended.

5. Fill the cupcake liners three-quarters full with batter and bake until baked through and golden brown, about 18 to 22 minutes. Remove from the pan immediately and let them cool completely on a wire rack before topping with your favorite frosting.  Cream Cheese Frosting or Buttercream frosting?

Rich Cream Cheese Frosting

♥ Beginner

Cream Cheese Frosting is one of the two frostings that I like to use all of the time.  It's either cream cheese or buttercream, and the cupcake pretty much determines which one I use.  The only bad thing about the cream cheese frosting is that it needs to be refrigerated after you make it.  So I like to keep it in tupperware if I make it the day before I serve them, and then just decorate right before they are served. It lasts about 3-4 days covered in the refrigerator.

The best thing about cream cheese frosting is that you determine how creamy it is.  I LOVE the taste of cream cheese, so I often keep the powdered sugar on the minimum (basically just for consistency) so you can still really taste the cream cheese.  My husand is a huge fan, just last week I caught him going back for a THIRD cupcake.  I'm sure many of you would feel the same!

I'll keep this recipe pretty basic, but you can always substitute for a flavored extract or real fruit juice. Even a great slice of strawberry added to the top is a great addition. ** My suggestion is to try this on a great red velvet cupcake - it's so great it will make you crazy!

What you need:

  • 1 (8 oz) reduced fat cream cheese, at room temp.
  • 1 stick unsalted butter, at room temp.
  • 1 tsp. pure vanilla extract
  • 4 cups confectioners' sugar, sifted
How it's done:

1. Cream the cream cheese and butter until smooth.

2. Add the extract, blend on medium speed until it's mixed in.

3. Slowly add the powdered sugar one cup at a time on medium speed, blending completely before adding the next cup. Add to taste.

4. Add color if desired!

See, isn't that easy???

Double Chocolate Cupcakes

♥ Beginner
I have to give credit where credit is due, and honestly I would never have made my own cupcake batter if it weren't for my husband.  I usually just stick with the box mixes (especially when it comes to Chocolate) but he suggested that I make my own for once so I tried it.  It really is better homemade if you have the time.  So, there you go he gets credit for this one.

I also should thank good ol' Wilton too, since this was their recipe adapted.  Isn't that nice of them to supply me with something I could make my own?  Just for the record, their recipe is here.

What you'll need:
  • 2 1/4 C All-purpose flour
  • 1 Teaspoon baking powder
  • 1 Teaspoon baking soda
  • 1/2 Teaspoon salt
  • 3/4 C Butter or margarine room temperature
  • 2 C Sugar
  • 3 Eggs
  • 1 Teaspoon Vanilla Extract
  • 1 1/2 C Milk
  • 3 Ounces Unsweetened Chocolate, melted
  • 3 Tablespoons Hersheys Chocolate Syrup


How it's done:

1. Preheat oven to 350°F. Put liners into the pan.

2. Combine flour, baking powder, soda and salt. Set aside.

3. In large bowl, cream butter and sugar with electric mixer until light and fluffy. Add eggs, one at a time, and vanilla; medium speed only until mixed (over beating will cause your cupcakes to not rise).

4. Add flour mixture to creamed mixture alternately with milk, beating well after each addition. Add melted chocolate, and Hershey Syrup, and beat thoroughly.

5. Pour into prepared pan. Bake 18-23 minutes or until toothpick inserted comes out clean. Remove from pan immediately to wire rack.  Cool completely before decorating.

6. Top with a nice Buttercream Frosting or Cream Cheese Frosting.

Sunday, March 20, 2011

Not your Grandma's Chocolate Eclair Cupcakes

♥♥ Intermediate

 My grandma (we call her Bommie) is a great baker.  Even from the time I was little I can remember her making yummy pot roasts, divinity candy, and of course Eclairs. Her eclairs are things dreams are made of.  They don't always look super pretty, but it doesn't even matter because they taste so good. And really, it's all about the feeling we have when we can smell them baking in the kitchen. I'll never forget sitting around the Christmas tree with the entire family eating eclairs and laughing about the silliest things.  

So, in homage to my Bommie, I decided to create a Chocolate Eclair Cupcake.  I'll be honest with you, I like the concept and the taste (they taste exactly like an Eclair) but it's still not up to par with the actual Eclairs that Bommie makes.  Maybe it's just one of those things that no other baked good will even be able to live up to. However, in an attempt to make a quick eclair that tastes awesome, this is what I created. I hope you'll be able to share this with your family, and maybe even make it one of your favorite memories too.

For those of you who may not know what an Eclair even is (shame on you, but my husband didn't know either so you're in good company), it's traditionally a hollow choux pastry stuffed with a creamy ricotta or vanilla pastry cream topped with a chocolate glaze. Basically, it's a great treat that is easy to convert to a cupcake!

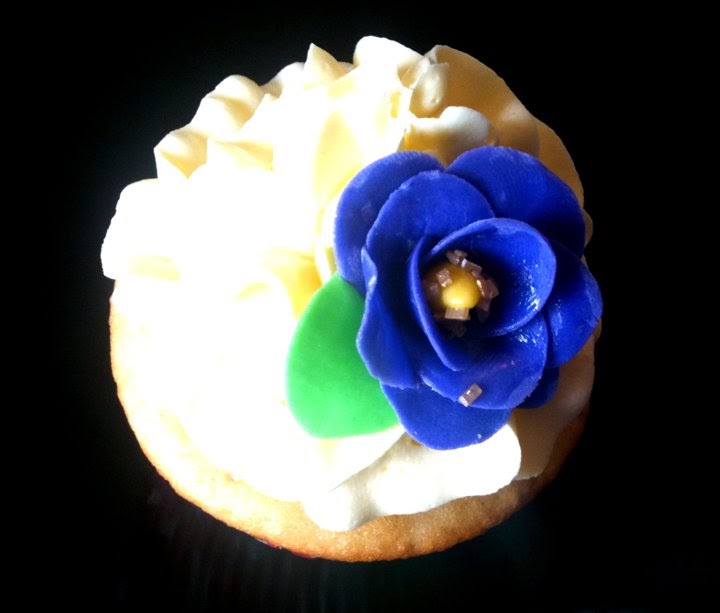
*I apologize in advance for my photos, I took them with my cell phone, even though I knew better. :)

**These cupcakes require refrigeration, will last up to 4 days refrigerated in an air tight container.

What you'll need:

Here's the deal, I'm a fan of using a box mix for my cupcakes IF they are the appropriate flavor.  I'm not running a business where I have to worry about excess overhead, and I don't see the need to reinvent the wheel either.  With that said, I'm a fan of using a traditional yellow cake for this recipe. (Duncan Hines has a fantastic yellow cake.) But if you're feeling adventurous, you can make your own cupcake batter too. This cupcake recipe is an all around "Cheat" to cupcakes - it's pretty much all a mix!
  • Yellow Cake Mix
  • French Vanilla Instant Pudding Mix
  • 2 C. Milk
  • 8 oz. Whipped Cream
  • 1/2 C. Heavy Cream
  • 4 oz. Semisweet Chocolate
How to do it:

1. Preheat oven to temperature set on cake mix, and mix cupcake batter. Bake. Let cool completely.

2. Mix Vanilla Pudding as directed on packaging, let set.  Once pudding is set, fold in whipped cream to make it light and fluffy.

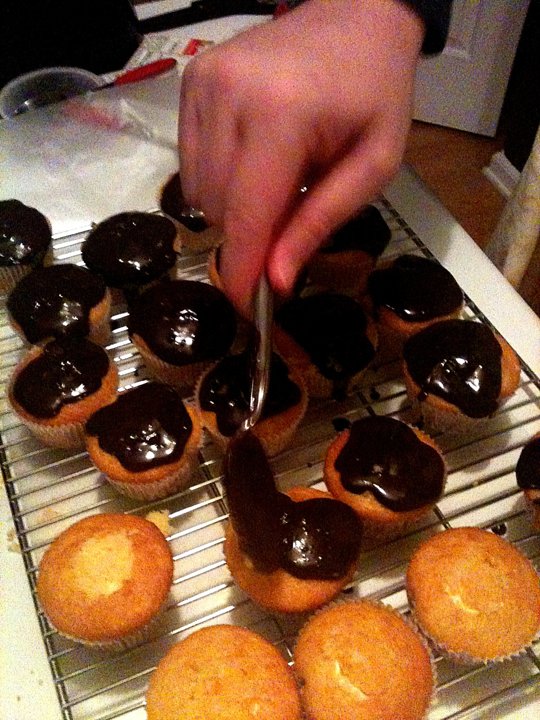
3. After the cupcakes have cooled, take a sharp knife to the center of the cupcake in a circular motion cutting a nickle sized hole in the top of the cupcake and removing some of the insides. Take all of the removed portions and crumble them up and set them aside.

4. Using a piping bag with no tip, fill the cupcakes to as close to the top of the cupcake as possible (sometimes if you bang the cupcake on the counter after filling them, the filling will seep further down into the cupcake removing air and allowing you to fill them even more).

5. Cover the hole in your cupcake with the crumbled cupcakes filler that you set aside.

6. Heat cream until you see bubbles forming at the edge. Remove from heat.

7. Add chocolate and let sit for a minute, and then stir until smooth.

8. Drizzle on top of your cupcakes for the finished product!  (The chocolate is the BEST part!) They do not have to be perfect, half the fun is in how imperfect eclairs really are!

Italian Cannolli Cupcakes

♥♥ Intermediate
These cupcakes were a real treat around our house.  With my family being part Italian (my maiden name is Vivona, is there any question?) they were a real crowd pleaser.  The only tough thing with these is that you should only really make as many as you can eat in one sitting (or have fridge space for). But really, they make such a great dessert.  And they need to be eaten with a fork, so I can call it dessert!

Because they are filled with a riccotta cheese, they'll need to be refrigerated once they're made. 

What you'll need:

Vanilla Cupcakes: (Or you can use a Vanilla Cake Mix like this one)
Yields 24 Cupcakes
  • 2 1/2 cups flour
  • 1 teaspoon baking powder
  • 1/2 teaspoon baking soda
  • 1/2 teaspoon salt
  • 3 large eggs
  • 2 cups sugar
  • 1 cup oil
  • 2 teaspoons vanilla extract
  • 1 cup sour cream
Chocolate Chip Cannolli Cream Filling:
  • 16 ounces whole milk ricotta cheese
  • 3/4 cup confectioners' sugar
  • 1/2 teaspoon vanilla extract
  • 1/2 cup mini semisweet morsels
How it's done:

1. Preheat the oven to 350* and line the cupcake pans with liners.

2. Sift the flour, baking powder, baking soda, and salt in a bowl. Set aside.

3. In a mixing bowl fitted with a whisk attachment, beat the eggs and sugar until blended. Scrape down the sides of the bowl. Add the oil and vanilla. Mix until well blended. Add the sour cream. Mix until just mixed in, not too long.

4. Add the dry ingredients to the wet mixture, and mix until just blended.

5. Fill the cupcake liners three-quarters full with batter and bake until baked through and golden brown, about 18 to 22 minutes. Let them cool completely on a wire rack.

For the Cannolli Filling:


1. In a mixing bowl fitted with the whisk attachment, beat the ricotta, confectioners' sugar, and vanilla on medium speed for about 5 minutes. Stir in the mini morsels.

To Assemble:

Using a small knife, cut on an angle directly into top of the vanilla cupcake in a circular pattern, staying within the perimeter of the top, removing the inside of the cupcake in one piece. Take all of the removed pieces of cupcake and crumble all together into a small bowl.
 
Using a piping bag (without a tip), fill the inside of the cupcake with Chocolate Chip Cannoli Cream. 

Top the filled cupcake hole with the crumbled cupcake fillings, and frost with a Classic Buttercream Frosting. Top with mini chocolate chips if desired!

Basic Buttercream Frosting

♥ Beginner


I love a good Buttercream Frosting... I am a believer in basics, and for me it's either a Buttercream Frosting or a Cream Cheese Frosting.  I'll rarely venture out to the French Creme or pastry frostings unless I think it's absolutely neccessary.  Since I do usually stick to the same-ol frosting, I like to flavor them with extracts and real fruits.  Here's a basic Buttercream Frosting recipe for you to enjoy and experiment with... let me know if you come up with anything great!


What you'll need:

  • 1 Teaspoon Vanilla Extract
  • 3 Teaspoons of Milk (Vitamin D or whipping cream depending on desired consistency)
  • 1/2 Cup Softened Butter
  • 4 C. Confectioners Sugar, Sifted
How to do it:

1. Cream butter on Medium-Low speed in mixer.

2. Add Milk and vanilla extract to creamed butter.

3. Slowly add sifted sugar 1/2 C. at a time until you reach desired consistency.  For piping consistency, you'll add more sugar, and for speading consistency you'll need to add more milk.


Strawberry Buttercream Frosting
** To experiment with other flavored extracts, just substitute the vanilla extract for your flavoring or fruit juice!

Stuffed Black Forrest Cupcakes!

♥♥ Intermediate

These are my #1 Favorite Cupcakes EVER!

What you'll need:

1 package chocolate cake mix (unless you're up for making your own batter) - This is what I would suggest if you're using a mix.
1 package (8oz) Philladelphia Cream Cheese
1 Egg
2 Tablespoons Sugar
1/2 Can Cherry Pie Filling
1 Jar of Marachino Cherries

How to do it:  
1. Preheat the oven to 350*, and mix the cake batter as directed on the package.

2. Mix cream cheese, egg, and sugar until well blended.  Don't over mix though, just until creamy.

3. Pour 1 1/2 Tablespoons cake batter into baking cups, cover with 1 Tablespoon of the cream cheese mixture. Top with 2-3 cherries of the pie filling, and cover with remaining batter.  (Once all is said and done, you shouldn't be able to see any cherries or cream cheese!)

4. Bake for 18-23 minutes, or until a toothpick comes out clean.  Let cool for 5 minutes in the pan, and then remove and let set on a wire rack.

5. Top with Butter Cream Frosting and a cherry!

These make a really great treat for gifts.  Everyone is always impressed when they take a bite of these special cupcakes, and discover that they're filled! 

Enjoy!

Strawberry Buttercream Frosting

♥ Beginner
STRAWBERRY BUTTERCREAM FROSTING
 I recently tried this Strawberry Buttercream Frosting on a decadent Double Chocolate Fudge Cupcake, so as you can imagine it is worth sharing. Below is the recipe for any of you who may be daring enough to try it.  Its yields about 4 cups.

What you'll need:
  • 3 sticks unsalted butter, softened
  • 1 lb. confectioners' sugar, sifted
  • 1/2 teaspoon strawberry extract (I prefer the clear one, so I can color to my liking)
  • Food coloring (optional)
Directions:
1. Beat the butter on Medium-High speed until creamy (roughtly 2 minutes)
2. Reduce your mixer speed to Medium and add the sugar a 1/2 C. at a time. After every two additions move mixer speed to high for 15 seconds, and then return to Medium for the following additions.  Add until desired consistency.
3. Add extract and beat until smooth.
4. Add food coloring if desired.
Tips!
Cover and refrigerate until you're ready to use.  It can be refrigerated for up to three days, however the extract may have a different taste if refrigerated for a long period of time.
Bring to room temperature and beat until smooth after refrigeration & before serving.

An Edible Paste... Finally!

♥♥♥ Advanced
I can promise you one thing, I NEVER tasted the paste in my kindergarten classroom.  My husband however, is a totally different story.  And he promises that it really did taste good.  In homage to my husband I've begun to play with Gum Paste - a paste that's acceptable to eat.  Finally.

I made these gum paste flowers a few days ago, and added them to my cupcakes.  It brought a whole new level to my cupcakes and we're actually a lot of fun to make.  My daughter thought so too (I let her play with it too!),  and she definitely ate her fair share.

 I've had a few friends who have asked me how to make these little gems, so I figured it would be a good idea to put together a little tutorial (with what limited knowledge I have) on how they are made.  This really was my first attempt at these, so I'm sure there are more professional and easier ways to do this if you have all of the right tools - I'm just not there yet.  So we'll make due with what we have.  Sound good? Let's get started!

Here's what you'll need:
  • Food Coloring, or Icing Color, in the colors you prefer (Here's what I like)
  • A box of Tooth Picks (or dowel rods for larger flowers for cakes)
  • One Egg White (As an adhesive - although water can be used as a substitute, it generally doesn't hold as well.)
  • A paintbrush for applying the egg whites
  • If necessary, fondant cutters (shapes) or a knife.
  • If you want some texture in the centers of your flowers, you can use decorators sugar, etc.
  • Green Floral Foam (It makes it easier to stick your flowers in while they dry)
  • Rolling Pin
  • Wax Paper

To begin, mix up your Wilton's Gum Paste per the directions on the side of the can.  If you've purchased the pre-made gum paste you can skip this step.

Next, separate gum paste into several different pieces, depending on how many colors you plan to use.  I suggest about an 1/8 C. per color (So very little amounts if you're only making 10-12 flowers).  Generally, you'll be using more pink, blue, etc. than you will green or yellows for the leaves or stigmas. Add a little color to each section, and knead until they are the colors you like. (The amounts I'm showing are much less than 1/8 C, but I've been using them...)

Depending on the size flowers you will be making, the amounts may vary but for purposes of this tutorial, we'll be making 10-12 quarter size flowers (small enough to not be too heavy for the toothpicks). Once your gum paste is mixed, separated, and colored, we can begin making some flowers!

Lay out a sheet of wax paper, and dust it with a little powdered sugar so your gum paste doesn't stick.  Make sure that while you aren't using each color you keep them in airtight containers or Ziploc bags lined with shortening because the gum paste dries out VERY QUICKLY.

Take a *pinch* of yellow for the stigma, and gently roll it in between your two hands.  If your hands are too warm it will melt and stick to your palms.  You may need to dust your hands with powdered sugar, but remember that you need to work quickly because the paste hardens fast.

Once the stigmas are rolled to the shape you would like, stick the toothpick in the bottom end, and sit up in your foam to dry for 20-30 minutes.  I used a jar of rice because I didn't realize I was out of my floral foam, so anything will work as long as they can stand upright.  They don't need to be perfect, they can literally be any shape you would like!

Once the stigmas are dry, you can begin working on the petals.  This is when it gets to be a lot of fun.  You can make your flowers look any way that you would like! A one petal Calla Lily, punch outs from the fondant cutters, or even just a normal flower with hand shaped petals. Just roll out the paste color of your choice to the thickness you desire (I like 1/16 in), and start cutting!

*Preface: My gum paste has been colored for a few days, so it's a little more brittle than it would be if it were used the same day it were made.  My edges may be a little more rough than yours should be.

**Suggestion:  Make these the day before you serve the cupcakes, and leave them out over night. add them to your cupcakes just before serving.  If they are left covered or refrigerated they will wilt... go figure!

Calla Lily:
Roll out your colored Gum Paste to the thickness you desire.

Cut out desired shape.  Tear drop shape is best for Calla Lily's, but you can see here that I used a pointier shape. 

Pick up the petal and smooth and flatten the edges. Draw a line down the center lightly with your knife. This will allow the petal to bend easier in the middle.

Brush a small amount of egg white on the bottom half of your petal.  The egg white acts as an adhesive.

Be careful not to press too hard and pull the stigma off of the toothpick.  Between your warm hands and the moisture of the egg white, the stigma will become soft again. As you gently wrap the petal around the stigma gently smooth edges together.  You may have excess petal at the bottom of the flower but that's okay, just gently pinch off the excess and pull toward the bottom of the toothpick to remove it.
 
This should be what your Lily looks like after you've smoothed the petal around the stigma.

I like to lay the Lily's down on a plate to dry, in order to keep the petal upward. Once the flower is dry again (10-20 minutes) you can add a leaf if desired. (Leaf instructions below)
You can either leave the tooth picks in the flowers and use them as a support in the cupcake (I would suggest it), as well as making it easier to remove them from to cupcakes.  They are edible, but I would not suggest it since you use raw egg white as an adhesive. 

Six-Petal Flower

Again, you can remove the toothpick after it hardens, or leave it in, but my suggestion would be that you leave them in to add support while they rest in the frosting.
Roll out six pinches of gum paste, some larger and some smaller, into balls. 
Flatten each ball.
After smoothing and flattening each edge of each circle, wipe the bottom half of each in egg white.

Wrap one petal around the stigma, and flatten at the bottom.
Add another petal, overlapping the previous petal until three completely cover the stigma.
Add the final three petals at the intersecting points, and smooth the bottoms of each.
Wipe completely with egg white and allow to harden (10-20 minutes).

Let dry in upward position to keep the petals from flattening against any other surfaces.

Last, but certainly not least...
Leaves:
Just like the petals, begin with a ball, and flatten and form into a leaf.


Add egg white to bottom half of leaf...
Smooth onto the base of the flower.  I like to use it in a place where I feel like the flower may be uneven.
 
Sorry this photo is the wrong direction, but you get the idea. 
Let stand to dry - I like the completed flower to be able to dry over night.
Once the flowers have dried over night they should be almost rock hard.  You still have to be fairly gentle with them, but it should be pretty easy to stick them into your frosting and cupcakes.

And here's your finished product!
If you wish to have colored sugar on the stigmas, then just before you go to put them on the cupcakes, wipe the stigma in egg white and dip in sugar.

So, it's a far cry from those days in kindergarten when my husband would taste the paste, but I'm willing to bet he would prefer these anyway.  I hope you have as good of an experience as I have had making these beautiful little gems.  Please leave your comments below and let me know what you think or if you have any questions.

Good luck!